Automatic Pet Feeder Manual PDF: A Comprehensive Guide
This comprehensive guide provides instructions for assembling, programming, and maintaining your automatic pet feeder. It covers essential aspects like power source selection, feeding schedule setup, and cleaning procedures. By following this guide, you can ensure your pet receives timely and appropriate meals.
Understanding Automatic Pet Feeders
Automatic pet feeders are designed to dispense food to your cat or dog at predetermined times, offering a convenient solution for busy pet owners or those with irregular schedules. These devices ensure consistent feeding, promoting your pet’s health and well-being by regulating portion sizes and meal frequency;
Many automatic feeders come equipped with features like programmable timers, portion control settings, and even WiFi connectivity for remote management via a mobile app. Some models also include voice recording capabilities, allowing you to record a message that plays during mealtimes, comforting your pet when you’re away.
Understanding how these feeders work is crucial for proper usage. Most feeders utilize a rotating mechanism or a dispensing auger to release food from a storage container into a bowl. The timing and amount of food dispensed are controlled by the user through the feeder’s interface or a connected app.
Before using an automatic pet feeder, carefully review the user manual to understand its specific features and functionalities. Proper setup and programming are essential for ensuring your pet receives the correct amount of food at the scheduled times. Regularly monitor your pet’s eating habits and adjust the feeder’s settings as needed to maintain a healthy diet.
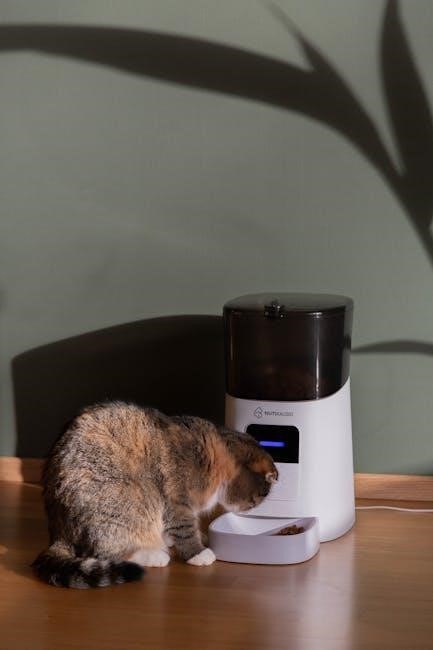
Key Components of an Automatic Pet Feeder
Understanding the key components of your automatic pet feeder is essential for proper operation and maintenance. The main components typically include a food storage container, a dispensing mechanism, a control panel or interface, a power source (adapter or batteries), and a food bowl.
The food storage container holds the pet food and is usually made of BPA-free plastic. Its capacity varies depending on the model. The dispensing mechanism, often a rotating wheel or auger, releases the food from the container into the bowl. Portion control is managed by this mechanism and calibrated through the control panel.
The control panel allows you to program feeding schedules, set portion sizes, and manage other settings. It may feature buttons, an LCD screen, or a combination of both. Some feeders offer WiFi connectivity, enabling control through a mobile app.
The power source can be either a power adapter, batteries, or both. Using the correct power supply is crucial to avoid damaging the feeder. Finally, the food bowl is where the dispensed food is delivered for your pet to consume. Understanding these components allows for effective troubleshooting and ensures your pet feeder operates as intended.
Assembling Your Automatic Pet Feeder
Assembling your automatic pet feeder correctly is crucial for its proper functionality. Begin by removing all components from the packaging, ensuring you have the main feeder body, food tray, food container, and any accessories like power adapters or user manuals. Inspect each part for any damage incurred during shipping.

Next, align the food tray with the base of the feeder. Typically, there are corresponding slots or connectors that need to be properly aligned and pushed together until they click or lock into place. Ensure the food tray is securely attached to prevent accidental detachment during operation. Then, place the food container on top of the feeder body, making sure it sits firmly and aligns correctly with the dispensing mechanism.
If your feeder includes a desiccant container, insert it into its designated slot to keep the food dry and fresh. Finally, connect the power adapter to the feeder and plug it into a power outlet, or insert batteries according to the manufacturer’s instructions. Once assembled, perform a manual test to ensure the feeder dispenses food correctly before programming the feeding schedules. Always consult your user manual for specific instructions related to your model.
Powering the Feeder: Adapter and Batteries
Your automatic pet feeder typically offers two power options: a power adapter and battery backup. The power adapter is the primary source, ensuring continuous operation when plugged into a standard electrical outlet. It’s crucial to use the original 5V power supply provided with the feeder to prevent damage to the internal components. Using an incorrect adapter can lead to malfunction or even permanent failure.
Batteries serve as a backup power source, providing uninterrupted service during power outages. Most feeders use standard batteries, such as D-size or C-size, and it’s recommended to use high-quality alkaline batteries for extended lifespan. When inserting batteries, pay close attention to the polarity markings inside the battery compartment to ensure correct placement.
Regularly check the battery status, especially if you experience frequent power interruptions. Some feeders have a low-battery indicator that alerts you when replacement is needed. To conserve battery power, some models automatically switch to battery mode only when the adapter is disconnected. Always refer to your user manual for specific instructions on battery types, installation, and replacement procedures for your particular feeder model.
Initial Setup and Programming
Before your automatic pet feeder can dispense food according to your pet’s schedule, you need to complete the initial setup and programming. Start by removing the feeder from its box and all packaging materials. Place the feeder in your desired location, ensuring it’s on a stable and level surface. Avoid placing anything on top of the feeder, as this can interfere with the weighing mechanism in models equipped with precision portion control.
Next, connect the power adapter or insert batteries, depending on your preferred power source. The LCD screen should light up automatically, indicating that the feeder is powered on. If the screen doesn’t light up, double-check the power connection and battery installation.
Now you’re ready to begin programming. Most feeders have a control panel with buttons for setting the clock, meal times, and portion sizes. Refer to your user manual for detailed instructions on navigating the control panel and accessing the programming menus. It’s essential to set the correct time before proceeding, as the feeding schedule relies on accurate timekeeping. Take your time and carefully follow the steps outlined in the manual to ensure proper configuration.
Setting the Clock
Accurate timekeeping is paramount for the automatic pet feeder to dispense meals according to your desired schedule. Consult your feeder’s user manual to locate the clock setting function. Typically, this involves pressing a designated “Clock” or “Set” button on the control panel. The display will usually show flashing digits for the hours, allowing you to adjust them using the “Increase” or “Decrease” buttons.
Once the correct hour is set, press the “Set” button again to move to the minutes setting. Repeat the process of using the “Increase” or “Decrease” buttons to adjust the minutes until the correct time is displayed. Some feeders may also have an option for selecting AM or PM. Ensure that you choose the correct time period to avoid feeding your pet at the wrong times.
After setting both the hours and minutes, press the “Set” button one final time to confirm the time. The display should stop flashing and show the current time. Double-check that the time is accurate to prevent any feeding discrepancies. It’s also good practice to occasionally verify the clock’s accuracy, especially if the feeder is powered by batteries, as battery drain can sometimes affect timekeeping.
Programming Feeding Schedules
Once the clock is accurately set, you can proceed to program the feeding schedules. Refer to your automatic pet feeder’s manual for specific instructions, as the process can vary depending on the model. Generally, you’ll need to access the programming mode by pressing a designated button, such as “Meal Time” or “Schedule.” The display will then prompt you to set the feeding time for the first meal.
Use the “Increase” and “Decrease” buttons to adjust the hour and minute for the desired feeding time. After setting the time, you might be prompted to select the portion size for that meal. The portion size is often indicated by numbers, with each number corresponding to a specific amount of food. Consult your manual to determine the equivalent food quantity for each portion setting.
Repeat this process for each meal you want to schedule throughout the day. Many feeders allow for multiple meals, such as six meals per day, offering flexibility in managing your pet’s feeding habits. Once all the desired feeding times and portion sizes are programmed, confirm the settings by pressing the “Set” or “OK” button. It’s crucial to double-check all programmed meals to ensure accuracy and prevent over or underfeeding. Regularly review and adjust the feeding schedule as needed to accommodate your pet’s changing dietary requirements or activity levels.
Portion Control and Calibration
Accurate portion control is paramount for maintaining your pet’s healthy weight and preventing overeating or underfeeding. Automatic pet feeders offer pre-set portion sizes, but it’s essential to calibrate the feeder to ensure the dispensed amount matches your pet’s dietary needs. Different food kibble sizes can significantly impact the dispensed volume, leading to inaccuracies if not properly calibrated.
Refer to your feeder’s manual for calibration instructions, which usually involve dispensing a specific portion size and then measuring the actual amount dispensed. Use a kitchen scale to accurately weigh the food. If the dispensed amount deviates from the intended portion size, adjust the feeder’s settings accordingly. Some feeders have a calibration mode that allows you to fine-tune the portion sizes.
It’s recommended to periodically recalibrate the feeder, especially if you switch to a different brand or type of food. Also, consider the food density and shape, as denser or irregularly shaped kibble may require adjustments to the portion settings. By carefully calibrating and regularly monitoring the dispensed food, you can ensure your pet receives the precise amount of food needed to maintain optimal health and well-being. Remember that the general recommendation is 0.5 oz (16 ml) food kibble.
Manual Feeding Option
While automatic pet feeders excel at scheduled dispensing, the manual feeding option provides flexibility for occasional deviations from the programmed schedule. This feature allows you to provide extra food or treats outside the regular feeding times, which can be useful for training purposes, rewarding good behavior, or accommodating changes in your pet’s appetite.
Most automatic pet feeders have a dedicated button or a menu option to activate the manual feeding mode. When activated, the feeder dispenses a pre-set portion or allows you to select a specific amount of food. The manual feeding amount can usually be adjusted within the settings of the feeder. This is useful when you want to give them a larger or smaller portion of food.
However, it’s crucial to use the manual feeding option judiciously to avoid overfeeding your pet. Keep track of any manually dispensed food to ensure it aligns with your pet’s overall dietary plan. This will prevent excessive calorie intake, which can lead to weight gain and associated health problems. You should also make sure that the food is being dispensed correctly.
Connecting to WiFi (If Applicable)
Many modern automatic pet feeders offer WiFi connectivity, enabling remote control and monitoring via a smartphone app. To connect your feeder to WiFi, begin by downloading the corresponding app from the App Store or Google Play. Ensure your smartphone is connected to a stable 2.4 GHz WiFi network, as most feeders do not support 5 GHz networks.
Next, power on the pet feeder and put it into pairing mode, typically by pressing and holding a specific button until an indicator light starts flashing. Open the app and follow the on-screen instructions to add the feeder to your account. This usually involves selecting your WiFi network, entering the password, and waiting for the feeder to connect.
Once connected, the app will display the feeder’s status, allowing you to adjust feeding schedules, monitor food levels, and even dispense food manually from anywhere with an internet connection. Some feeders may also offer advanced features like notifications when food is dispensed or when the food level is low. If the setup fails, consult the troubleshooting section of the manual.
Using the Mobile App (If Applicable)

If your automatic pet feeder features WiFi connectivity, the mobile app is your primary interface for managing its functions. After successfully connecting the feeder to your WiFi network, open the app on your smartphone or tablet. You’ll typically be greeted with a dashboard displaying the feeder’s current status, including whether it’s online and the last time food was dispensed.
The app allows you to adjust feeding schedules remotely, specifying the time and portion size for each meal. Many apps also feature a manual feeding option, enabling you to dispense food outside of the scheduled times with a simple tap. You can also monitor food levels, often with notifications alerting you when it’s time to refill the feeder.
Some advanced apps offer additional features, such as voice recording, allowing you to record a message that plays when food is dispensed, and camera integration, enabling you to view your pet while they eat. Explore the app’s settings to customize notifications, manage multiple feeders, and access support resources. Be sure to keep the app updated for optimal performance and security.
Cleaning and Maintenance
Regular cleaning and maintenance are crucial for ensuring the hygiene and proper functioning of your automatic pet feeder. Before cleaning, always disconnect the power adapter and remove any batteries. Disassemble the feeder according to the manufacturer’s instructions, separating the food container, dispensing tray, and other removable parts.
Wash these components with warm, soapy water, ensuring all food residue is removed. Rinse thoroughly and allow them to air dry completely before reassembling. The main body of the feeder can be wiped down with a damp cloth. Avoid immersing the electronic components in water.
Periodically inspect the feeder for any signs of wear and tear, such as cracks or damaged parts. Replace any worn components as needed. Check the dispensing mechanism regularly to ensure it’s free of obstructions. Some feeders may have a desiccant pack to absorb moisture; replace this periodically to prevent food from becoming stale; Proper cleaning and maintenance will extend the life of your feeder and keep your pet healthy.
Troubleshooting Common Issues
Even with careful setup and maintenance, you might encounter occasional issues with your automatic pet feeder. This section provides guidance on troubleshooting common problems.
If the feeder isn’t dispensing food, first check the food level in the container and ensure there are no blockages in the dispensing chute. Make sure the feeder is properly powered, either by the adapter or batteries. If using batteries, verify they are fresh and correctly installed. Review your programmed feeding schedule to confirm the times and portion sizes are set correctly.
For connectivity issues with WiFi-enabled feeders, ensure your home network is functioning and the feeder is within range. Check the feeder’s connection status in the mobile app and try restarting both the feeder and your router. If the feeder’s clock is inaccurate, refer to the manual for instructions on resetting it.
If problems persist, consult the manufacturer’s website or contact their customer support for further assistance. Providing specific details about the issue and your feeder model will help them diagnose the problem and offer effective solutions.
Food Dispensing Problems
One of the most frustrating issues with an automatic pet feeder is when it fails to dispense food correctly. This section addresses common causes and solutions to get your feeder working smoothly again.
A frequent culprit is a blockage in the dispensing mechanism. This can occur due to food crumbs, overly large kibble, or even moisture buildup. Regularly clean the dispensing chute and food tray to prevent obstructions. Ensure the kibble size is appropriate for your feeder model, as some feeders are designed for specific kibble sizes.
Another issue can be insufficient power. If the feeder is battery-operated, replace the batteries with fresh ones; If using the power adapter, ensure it is securely plugged into both the feeder and the wall outlet. Test the outlet with another device to rule out a power issue.
Finally, check the programming settings. Verify that the feeding schedule is correctly set and that the portion sizes are appropriate. A malfunctioning portion control mechanism can also lead to dispensing problems. If this occurs, try recalibrating the feeder according to the manufacturer’s instructions.
Connectivity Issues
Many modern automatic pet feeders offer WiFi connectivity, allowing remote control and monitoring via a mobile app. However, connectivity problems can arise, disrupting scheduled feedings and remote access. Here’s a guide to troubleshoot common connectivity issues.
First, ensure your feeder is within range of your WiFi router and that the WiFi signal is strong. Obstructions like walls can weaken the signal. Try moving the feeder closer to the router or using a WiFi extender.
Next, verify that your WiFi network is functioning correctly. Check if other devices can connect to the internet. If not, restart your router and modem.

Confirm that you have entered the correct WiFi password into the feeder’s app or settings. Incorrect credentials can prevent the feeder from connecting.
Software glitches can also cause connectivity issues. Try restarting the feeder and your mobile device. Ensure the feeder’s app is up-to-date. If the problem persists, try resetting the feeder to its factory settings and reconnecting it to your WiFi network. Contact the manufacturer’s support for assistance if needed.

Power Supply Problems
Automatic pet feeders rely on a consistent power supply to function correctly, ensuring timely and reliable food dispensing. Power supply issues can lead to missed feedings, inaccurate portion sizes, and overall disruption of your pet’s feeding schedule. Understanding potential problems and troubleshooting steps is crucial.
Firstly, check the power adapter and ensure it’s securely plugged into both the feeder and the wall outlet. Inspect the power cord for any damage, such as frays or cuts. If damaged, replace the cord immediately.
If using batteries as a backup or primary power source, verify they are correctly installed and have sufficient charge. Replace batteries regularly, especially if your feeder relies heavily on them. Consider using high-quality batteries for longer lifespan and reliability.
Some feeders may have a power switch; ensure it’s in the “on” position. If the feeder still doesn’t power on, test the outlet with another device to rule out electrical issues. Contact customer support for further assistance if the power supply remains problematic.
Safety Precautions
Operating an automatic pet feeder requires adherence to safety precautions to ensure the well-being of your pet and the longevity of the device. Prioritize your pet’s safety by following these guidelines carefully.
Firstly, always use the original 5V power supply provided with the feeder to prevent electrical damage. Avoid placing heavy objects on top of the feeder, as this can affect the weighing mechanism’s accuracy. Regularly inspect the feeder for any signs of damage, such as cracked plastic or exposed wires.
Keep the feeder out of reach of children to prevent accidental tampering or ingestion of small parts. Ensure the feeder is placed on a stable surface to prevent tipping, which could injure your pet. When cleaning the feeder, always disconnect it from the power source to avoid electric shock.
Monitor your pet’s feeding habits and adjust portion sizes accordingly to prevent overeating or undereating. If you notice any unusual behavior or health issues, consult with your veterinarian immediately. By following these precautions, you can ensure a safe and reliable feeding experience for your beloved pet.
Choosing the Right Food for Your Feeder
Selecting the appropriate food for your automatic pet feeder is crucial for ensuring its proper function and your pet’s health. Consider several factors to make an informed decision.

Firstly, the size and shape of the kibble are important. Automatic feeders typically work best with dry food kibble of a consistent size and shape. Irregularly shaped or overly large kibble can cause jams or inconsistent dispensing. As different food kibble sizes will cause an error when dispensing food, program a suitable feeding plan.
Secondly, the type of food matters. While most dry foods are suitable, avoid using wet or semi-moist food, as these can clog the feeder and promote bacterial growth. Ensure the food is fresh and stored properly to prevent spoilage. Regularly check the food in the feeder for any signs of moisture or contamination.
Thirdly, consider your pet’s dietary needs. Choose a food that meets your pet’s specific nutritional requirements based on their age, breed, and health condition. Consult with your veterinarian to determine the best food for your pet’s individual needs. By carefully selecting the right food, you can ensure your automatic feeder operates smoothly and your pet receives a healthy and balanced diet.


Be the first to reply